Day One of Forces–Building a Strong Foundation I hope

This semester, I spent a lot more time upfront helping students to develop sense of what force is, how we see evidence of it happening, and how to productively talk about it.

Day 1:

Here were some of our goals /process  for day one (3 hours):

First, identifying interactions through “contact between objects that results in visible compression, stretch, or shear.”, then through the use of “bridging analogies” inferring the happening of contact forces even when the amount of compression, stretch, or shear make be nearly imperceptible.  For this students had a variety of objects to see compression (springs), tension (rubber bands), and sheer (combs).


After talking about them, I had stations set up where each force could be visibly identified, and students had to make a claim at each station about one contact force that was happening, and to identify which object was causing the force, where it was occurring, and the evidence for the type of interaction. The stations included:

  • An object suspended by two rubber bands (both stretched)
  • An object suspended by two springs (one compressed, one stretched)
  • An object sitting on a brush (with both sheer and compression) being pulled by a rubber band (stretch).
  • A buggy spinning its tires on a brush pressing (sheer and compression) into a ruler (compression).
  • A fan cart with fan turned on (with tinsel tied on the fan cover), pressing into a hoop spring (compression), resting on a bridge made of two rulers (which show compression).
  •  An object on a ramp supported on two sides by foam (both showing compression).

Second, our goal was to practice the language of force as a happening. We talked about parties, parties occur at a particular location, they start at a certain time, they persist for an amount of time, they end at a certain time. During the time of the party, the intensity of the party can range from mild to wild. When the parties is over, the participants can’t take the party home with them. Partying may have caused the participants to have changed their state (e.g., from sober to inebriated), and both the duration and intensity of partying can effect the amount of inebriation.

And so, it is the same with forces. A “forcing” between two objects, occurs at a particular location (the boundary between two objects where contact is made), they “forcing” starts at a particular moment, it persists for a certain amount of time, during which the force can range from gentle to intense, and then the “forcing” between objects come to a rest. The “forcing” event may have caused the object to change, but the object cannot take the “forcing” event with it.

Students were asked to be playful in investigating the claim: “During the time that an object is experiencing “forcing”, the object experiences a change to it’s motion.” They were asked to look at two changes specifically: “rest –> moving “, “moving –> rest (or possibly even turning around)”. They were asked to use a their finger, a coil spring, a hoop spring, a rubber band, and a comb,  guiding questions asked them to talk about force in a productive way, including

  • Identifying the object that was doing the forcing, and the object that experiences the forcing, and to identify evidence point to a specific type of interaction (compression, shear, or stretch).
  • Identify the specific location where the forcing was event was occurring (e.g, the forcing was occurring between the tip of the comb’s blades and the rubber side of the cart).
  • To identify the moment when forcing began, when it ended, and to consider whether the intensity of the forcing event more “gentle” or more “intense”, and whether the duration seemed “brief or extended” in time.


After introducing magnetic and gravitational quickly  as an example non-contact force (to be talked about in more detail later), students were given more practice identifying interactions where evidence is less perceptible (e.g., cable pulling an elevator, bicycle descending a hill, a car parked on a hill.

We ended the day discussing this clicker question:

One of our low-friction cart is at rest on a long track. The cart starts at rest, and then you at time t1, you press your finger against the car, maintaining a constant amount of pressure with the finger the remaining time. What will a velocity vs. time graph look like?

[I motivated this question by saying, we see evidence that “forcing” can caused an object to change it’s motion, but how do we think that change occurs”

Graph Choices

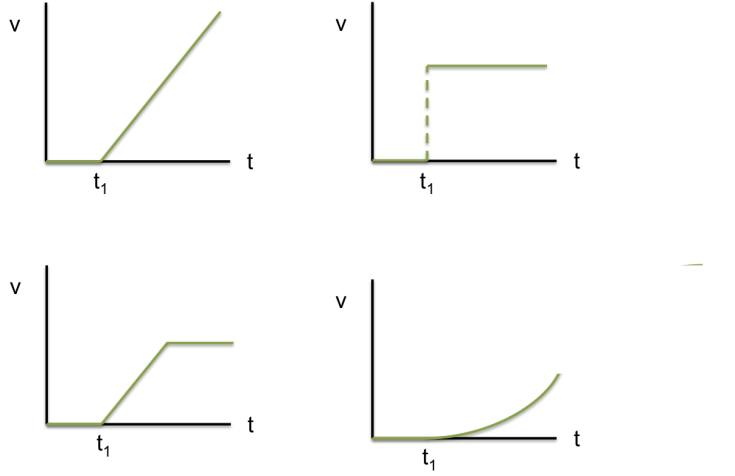
Last year, we some really great conversations about this question. And this year we did, too, but this year the conversations were entirely different, because of the time we spent talking about evidence/mechanisms of forces. Students were much more attuned to the feature of the question that said, “keeping constant pressure”

At first vote, we were all over the place. Many thought that the two graphs that leveled out were possible, depending on how quickly it got up to speed. But a growing contention of students were making a compelling case that when you first press against the cart (it tries to move away from you, which would naturally release some of the pressure, so you have to keep up with the cart to maintain constant pressure). To them that suggested that what naturally happens, most of the time, is when you press on something, you don’t actually exert a constant amount of press, and the in fact, a constant pressing should result in non-stop speeding up, with the cart speeding up to get away from you, and you speeding up to keep the pressure. Upon revoting, more and more students were thinking it had to be one of the two graphs showing speeding up the whole time.

I had planned it, but I got out the hover pucks, and asked students to go out in the hallway and investigate the idea that when you press against something, you have to keeping speeding up with the object to maintain a constant pressure. Everyone came back confirming that this definitely seemed to be the case… and wanting to know which of the two graphs it would actually be.

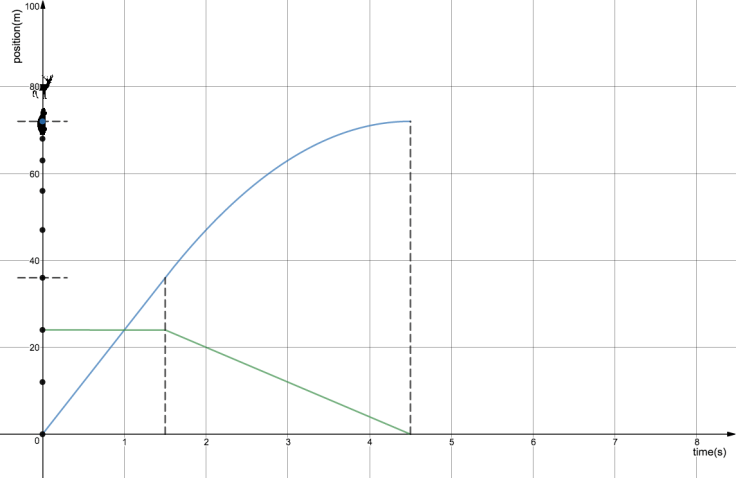
I might have waited until the next day, but we ended up getting out a fan cart at the end up and looking at the motion detector, showing that a steady fan push resulted in a steadily increasing velocity. The following day, we would return to investigate this more closely, which I tell about later.

Instructional Routine: Problem Solving

I’ve been trying to work on developing a instructional routine that I can pass on to the other instructors in our introductory college physics course. The instructional routine pertains to getting students engaged in problem-solving, and is intended to give them an alternative process to our Department’s typical routine.

So what’s our typical routine? Our typical routine, which certainly isn’t horrible, is “Example Problem –> Whiteboard Problem”. That is, the instructor poses a word problem, models how to solve the word problem, and then students are posed a similar word problem and are asked to solve it collaboratively on whiteboards, following the general process. This can go pretty well or pretty so-so depending on a lot of the details, but one of the biggest pitfalls can be this:

  • The process can put students into “Monkey see, Monkey do” mode, where they expect to mindless follow the algorithm their teacher teaches them.

So here’s the basic routine I’ve been working on (for which there are many variants),

First: Posing the Qualitative Scenario (with or without a question)

An example might be, “If we go outside and throw a ball as hard as we can, will it go high enough to get on top of the roof?”

Second: Making the Scenario a Problem

The qualitative scenario begs the question, “It depends”, so in the routine you typically ask students to think about what it depends on. It helps me to explicitly ask, “What information would we want to know about the situation to help decide?”

For the situation with throwing the ball above, I have gotten the following:

  • How tall the building is?
  • How tall the person is?
  • How fast the person throws the ball?
  • What the weather conditions are?
  • What type of ball is being thrown?

The instructor’s job is to “catch every contribution” and to either press the student connect it to disciplinary constructs or to offer a connection. One can ask follow ups, such as “Can you tell us why you think the height of the person matters?”, or weigh in yourself (e.g., “Yeah, that makes sense, a taller person might have an easier time getting).  In the above scenario, we had just talked about the conditions for free-fall, so I helped to offer the last two as information that would help us to know whether the conditions were or were not consistent with free-fall assumption. Depending on how much scaffolding you want at this time, you might connect each of those to constructs you’ve talked about like, “initial velocity”, “initial position”, but you might not.

The next task is to decide how that information will be gathered. I suggest one of three things can be done (or even some combination)

  • Estimating (e.g, how fast does a car go on a typical highway)
  • Measuring (e.g., using photogate to measure launch velocity.”
  • Researching (e.g., what are typical car braking accelerations.)

For the example above, I asked students to estimate the building height, person height, and initial velocity, and to also come up with a specific ball / weather that they think would be fairly consistent with free-fall. This is a good exercise in estimating but also in understanding the assumptions that go behind a particular model.

Students in my class, did a mix of estimate and measure. They measured the height of our room and used knowledge of how many floors to estimate the building height. Other groups used knowledge of baseball pitching speeds in mph to come up with a reasonable “normal person vertical speed.”, but others looked up information for “how fast can humans throw stuff.”

If students are to work the problem, the instructor can choose to have the class all work the same problem (get consensus on good estimates), or let groups work with different estimates. This day, we did a consensus problem:  1meter tall person, 20 meter tall building, 25 m/s throw, a baseball (not a ping pong ball), and no wind / no rain. I chose this day to do the unit converting for them from their speed estimate which was in mph, but I wouldn’t always do this. I also directed us to the specific question of, “How high above or below the roof height does the ball get?” so that it wasn’t just “yes or no”.

The truth is the whole setup process can be fairly quick (or stretched out) depending on needs. Even just giving students a 1-2 minutes to chat in groups, collecting their ideas at the board and quickly connecting it to disciplinary constructs, goes a long way for students to orient to the situation and understand the relevance of the information. You might quickly take measurements for students, or involve them in a process of measuring that information that takes significant time. It all depends. The point is to spend sometime turning the situation and question into a problem, and along the way practice some other skills such as estimation, measurement, making assumptions, etc. It need not be everything.

Solving the Problem: Creating and Using a Model

In my mind, the above steps play out well whether you are going to model how to solve a problem or have students solve the problem. In my class, students had already solved 1D acceleration problems, and we had just finished activities and discussion about free fall, so students were ready to jump into problem solving. In my class, they have to make motion diagrams, both qualitative position and velocity diagram, and then either write equations that describe those graphs, or use slope/area ideas.

There can be some advantages to all doing the same numbers, especially for a more novice instructor. You can more readily scan the room and compare students’ progress, and students can more readily compare their answers.

There are also good advantages to having different numbers out there. For example, if students choose different speeds, then you might be able to discuss how the speed seemed to effect the maximum height reached.

You can also deliberately seed some good comparisons — two groups both do 1m and 2m tall persons with the same speed, or 10 m/s, 20 m/s, 30 m/s throwing speeds.

Evaluating and Re-Posing

At the end, we want students to evaluate the reasonableness of their answer. This can be done in variety of ways. Depending on the type of scenario you are posing, you might be able to compare to experiment. One trick for doing this can be to ask students early on, maybe even before even posing the situation, “What do you think is highest height a ball can be thrown up to? What’s a height you know is too high? What’a a height you know is too low?” That way they can compare their final answer to the bounds they previously set as reasonable.

Re-posing is important, and there are couple ways this can go. Posing Questions First. You can ask students to pose different question about the same scenario (e.g., students asked in my class how much time the ball would be in the air when it hit the roof… how fast it would hit the roof). But you can also ask students to pose slightly new scenarios, like, “What’s the minimum speed needed to get it on the roof?” or “If you throw the ball with twice as much speed, will it go twice as high?” You can certainly pose questions to students. For example, after problem-solving I had a clicker question about on the issue how doubling the speed would effect the height.” But it’s important to get students in engaged in the process of asking question about the same scenario, posing questions about different scenarios. The last type of re-posing is a bit more school-ish but also helpful, “What’s a problem similar to this one that could be asked, but that’s more difficult to solve?”

This last step also gives quick students more and more places to go while other groups finish up. I also have one of my quick groups write simulations in desmos, as part of their modeling process.

Summary of the Routine:

Certainly, you could choose to invest a lot of time in having students fully engage in all the steps, but that’s not necessary. The point is to always engage the whole process, but students can carry more of the responsibility for some parts, you can carry more the responsibility for other parts. But here are the four main parts I see.

  1. Interest Making
  2. Problem Making
  3. Modeling Making
  4. Sense Making

I say the first one is “interest making” is because showing students actual situations or qualitative situations should be done in a manner as to possibly cultivate an inkling of engagement and curiosity about the situation. I’m not saying it needs to be magical.

The second one is “problem making”, because it’s about turning that situation into a problem by discerning relevant information, relating it to physics concepts. This is the core of the practice that I want students to get more practice with, and is the one that word problems are the worst at skipping.

The third one is to modeling making, because everyone is to develop and apply a model that can be used to solve the problem. This is what we typically think of as problem-solving, and this is going to look different in different classrooms, curricula, etc.

The last one is sense-making about returning to think about the outcome, the model, rethink the situation, and even new situations. In a sense, the end process puts you back at the beginning of posing situations and asking questions, so you come full circle. There are lots of different ways of sense-making, but it needs to be an explicit part of the process, and it needs to be more than, “Does your answer make sense?”

Challenge: Make it Simple, Imaginable, and Flexible:

The issue I see with any instructional routine is having it crafted as simple enough for an instructor to get started with it. They need to be able to not just follow the steps, but have a feel for the purpose of each step, and probably have a good image / sense of what it can look like. You don’t want to get bogged down in all the possible variations at first, but have it possible that flexibility will open up through practice. I got to figure out what’s the a good “touchstone” example for this routine is.

Sorry for the ramble, just getting down my thoughts.


“Coding” in Desmos for Algebra Based Physics

I’ve been thinking more and more about using Desmos in algebra-based physics for getting students involved in writing simulations.

You can get students up and running pretty quickly. Here are three lines of code to simulate an accelerating object.

screen-shot-2017-02-11-at-9-39-34-am

  • 1st line defines the equation of motion, y as a function of time
  • 2nd line plots the point.
  • 3rd line defines time as variable that you can “play”

Of course, you get quickly get more sophisticated:

Here is a simulation for dropping stones at 1 second intervals…

bwa431qp3x

Or a simulation for a vertical toss that blends with other representations

hfpuabfq33

And lots of other stuff you can add… like adding images, getting rid of graphing look

ge6eomgmcn

Or blend with motion diagrams

al56cwfmjy


What I also like about it is that if my students just type in an equation exactly the way it is in the book… like this


screen-shot-2017-02-11-at-9-53-49-am

It will prompt them to add sliders, which is what is needed to get the simulation up and running. You click “all”, and you are almost there.  You just need to plot a point…. and press play.

screen-shot-2017-02-11-at-9-55-40-am

Lots of cool things, like here in our lab where were trying to predict how far up a ramp a cart would go, we had a range of data for acceleration and initial velocity. So we could run the simulation for multiple values by defining acceleration and velocity as a list

Screen Shot 2017-02-11 at 9.58.27 AM.png

You get something like this…

in2bzqkord

I’m call this “Cranking Five Times”…. (high/high, high/low, low/low, low/high, avg/avg)

Anyway, starting to think more seriously about best way to really do this with students (rather than doing it haphazardly, but I’m pretty excited, because it seems totally doable for the algebra-based physics population.)

Blog at WordPress.com.

Up ↑