When You Have to: Model the Skills, not the Problem-Solving

In our ongoing pilot of revised algebra-based physics curriculum, we have been trying to get away from worked examples. See, in the old curriculum, everyday the instructor showed a worked example of whatever topic students were learning about. Then students would work collaboratively on similar problems (“white-boarding”). Most of you are probably aware of the pitfalls of this–students copy what you do and try to emulate exactly what you did on their problem. The result is this: If the problems students get are superficially similar enough to yours, most can do it. If the problems are not superficially similar, many students will flounder.

The issue at hand is that problem-solving is not learned via “monkey see, monkey do”. However, by teaching problem-solving this way, we give students a false impression that it is. When students were adopting this view of problem-solving, it was our own fault really. We were the ones that were organizing our classroom to make it seem like problem-solving should be learned via, “monkey see, monkey do”.

So if we aren’t doing worked examples now, what are we doing? This has been what’s working for us lately:

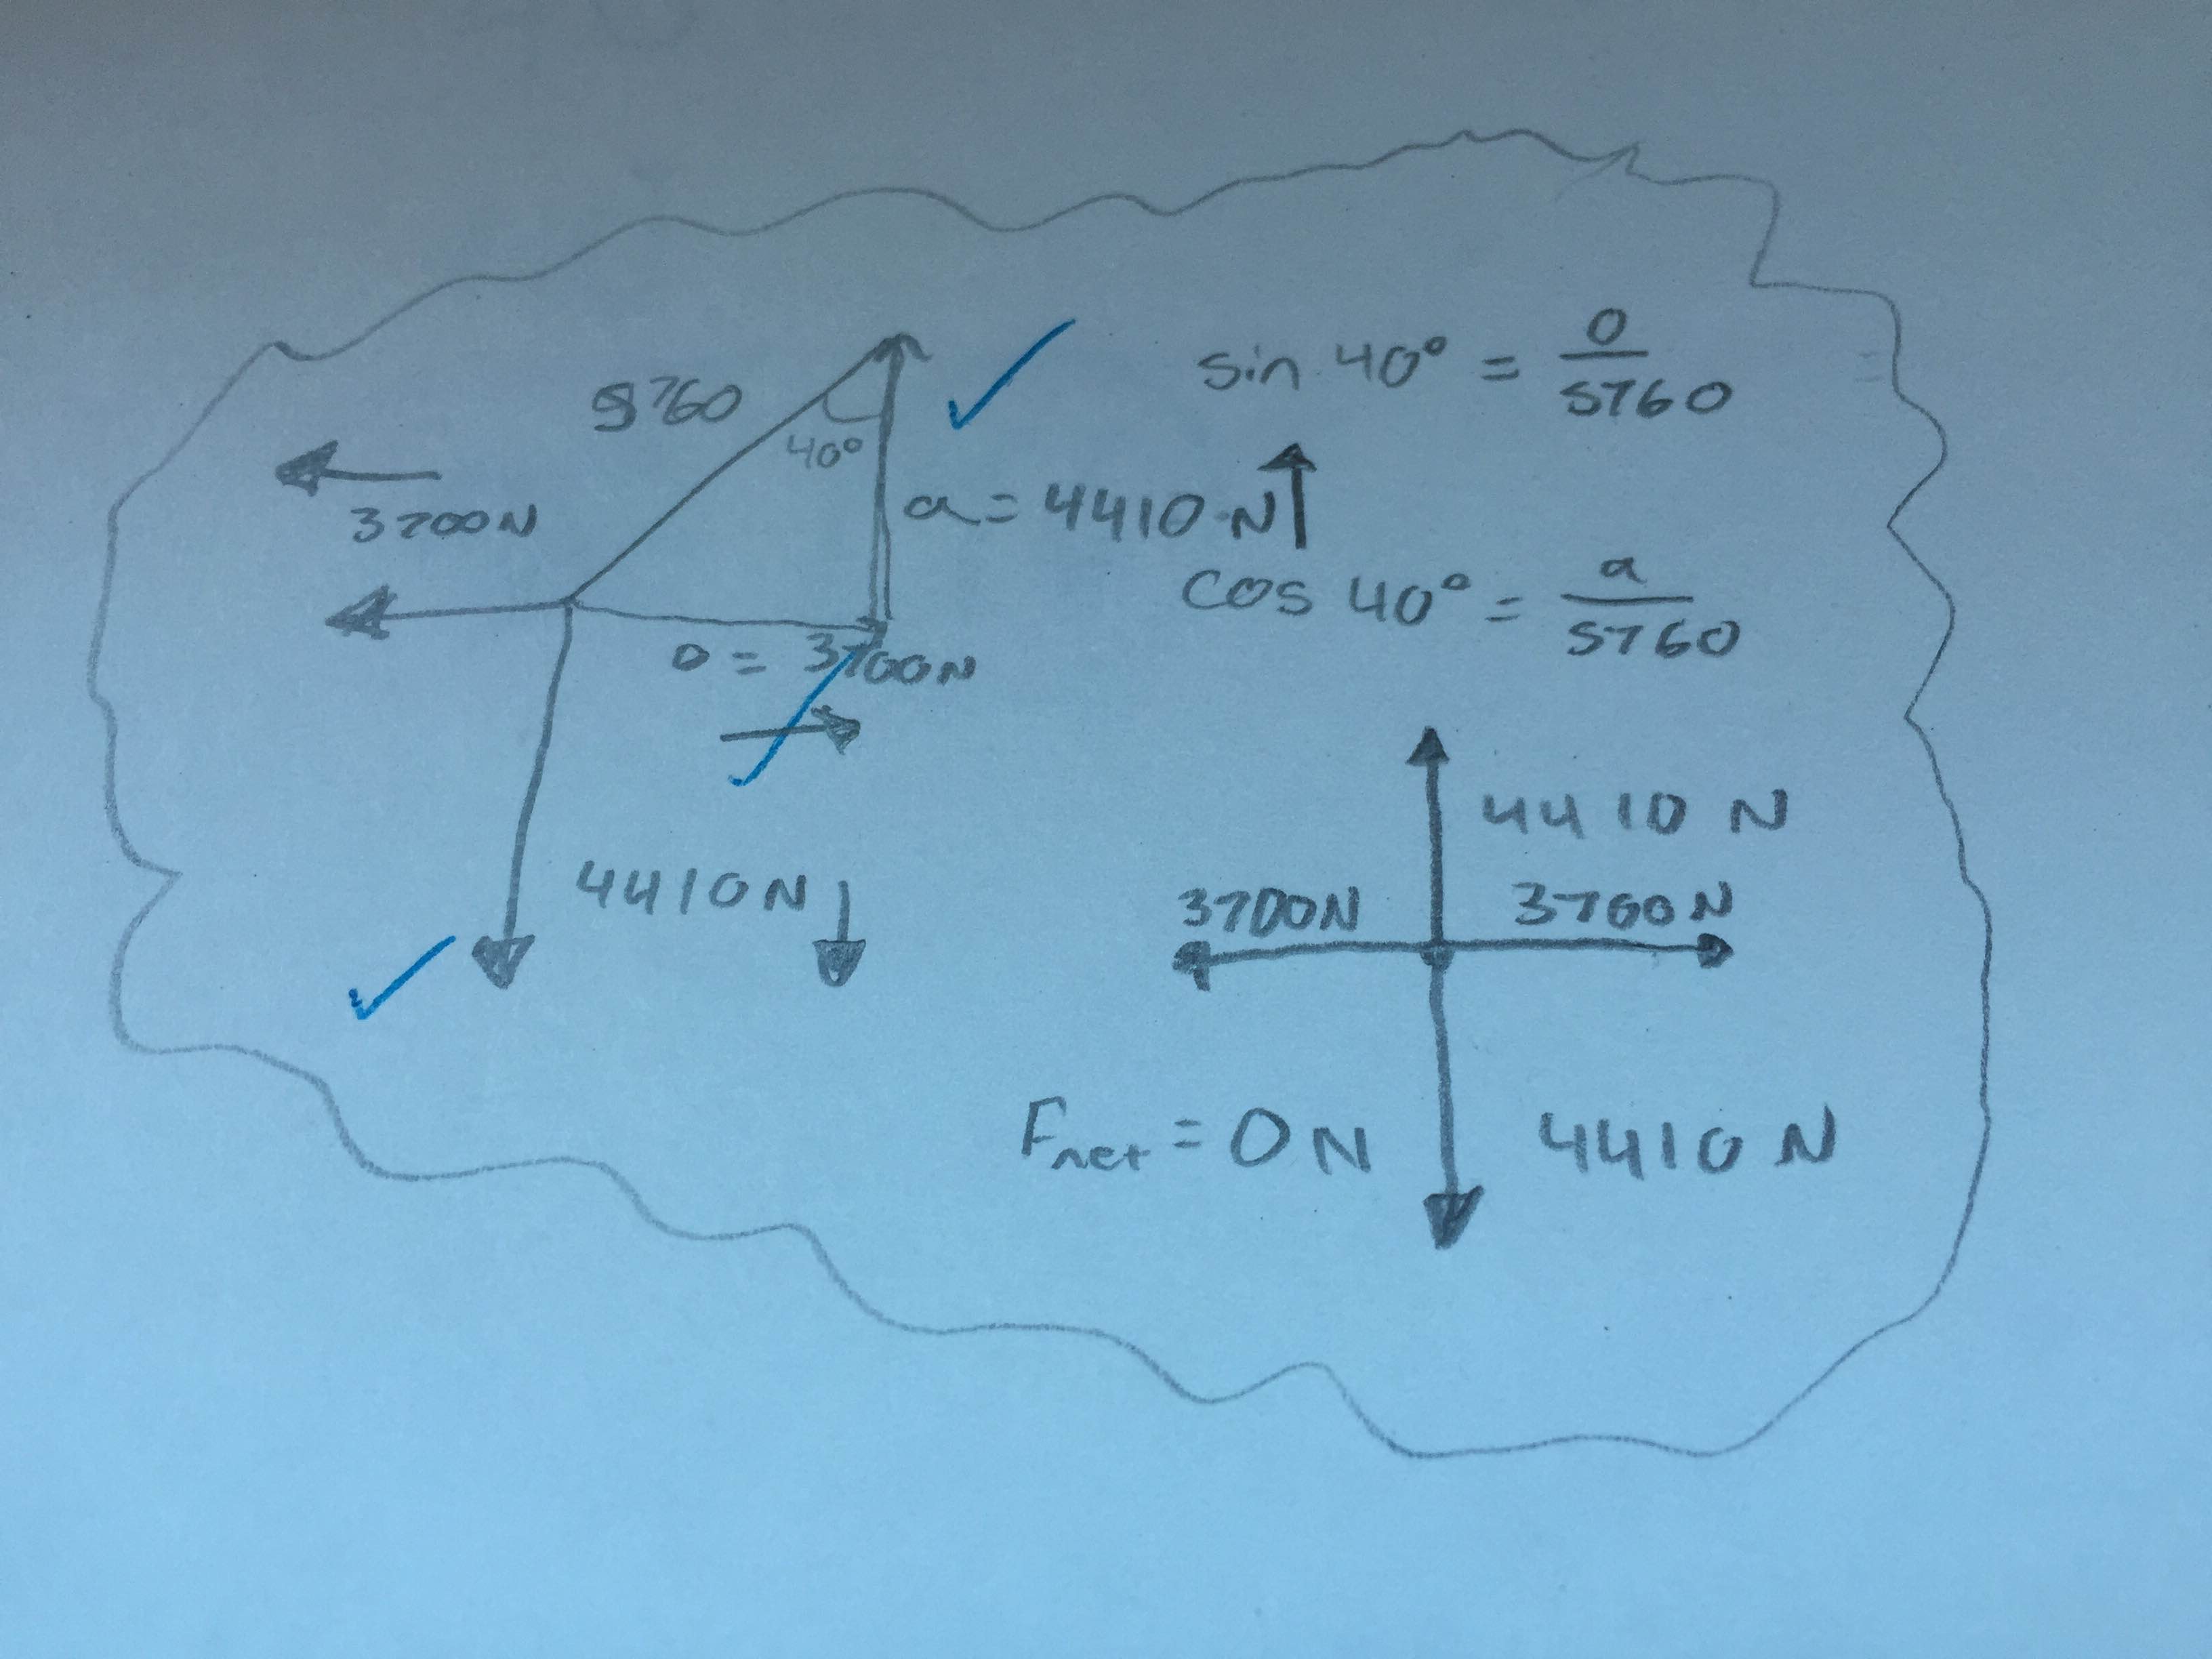
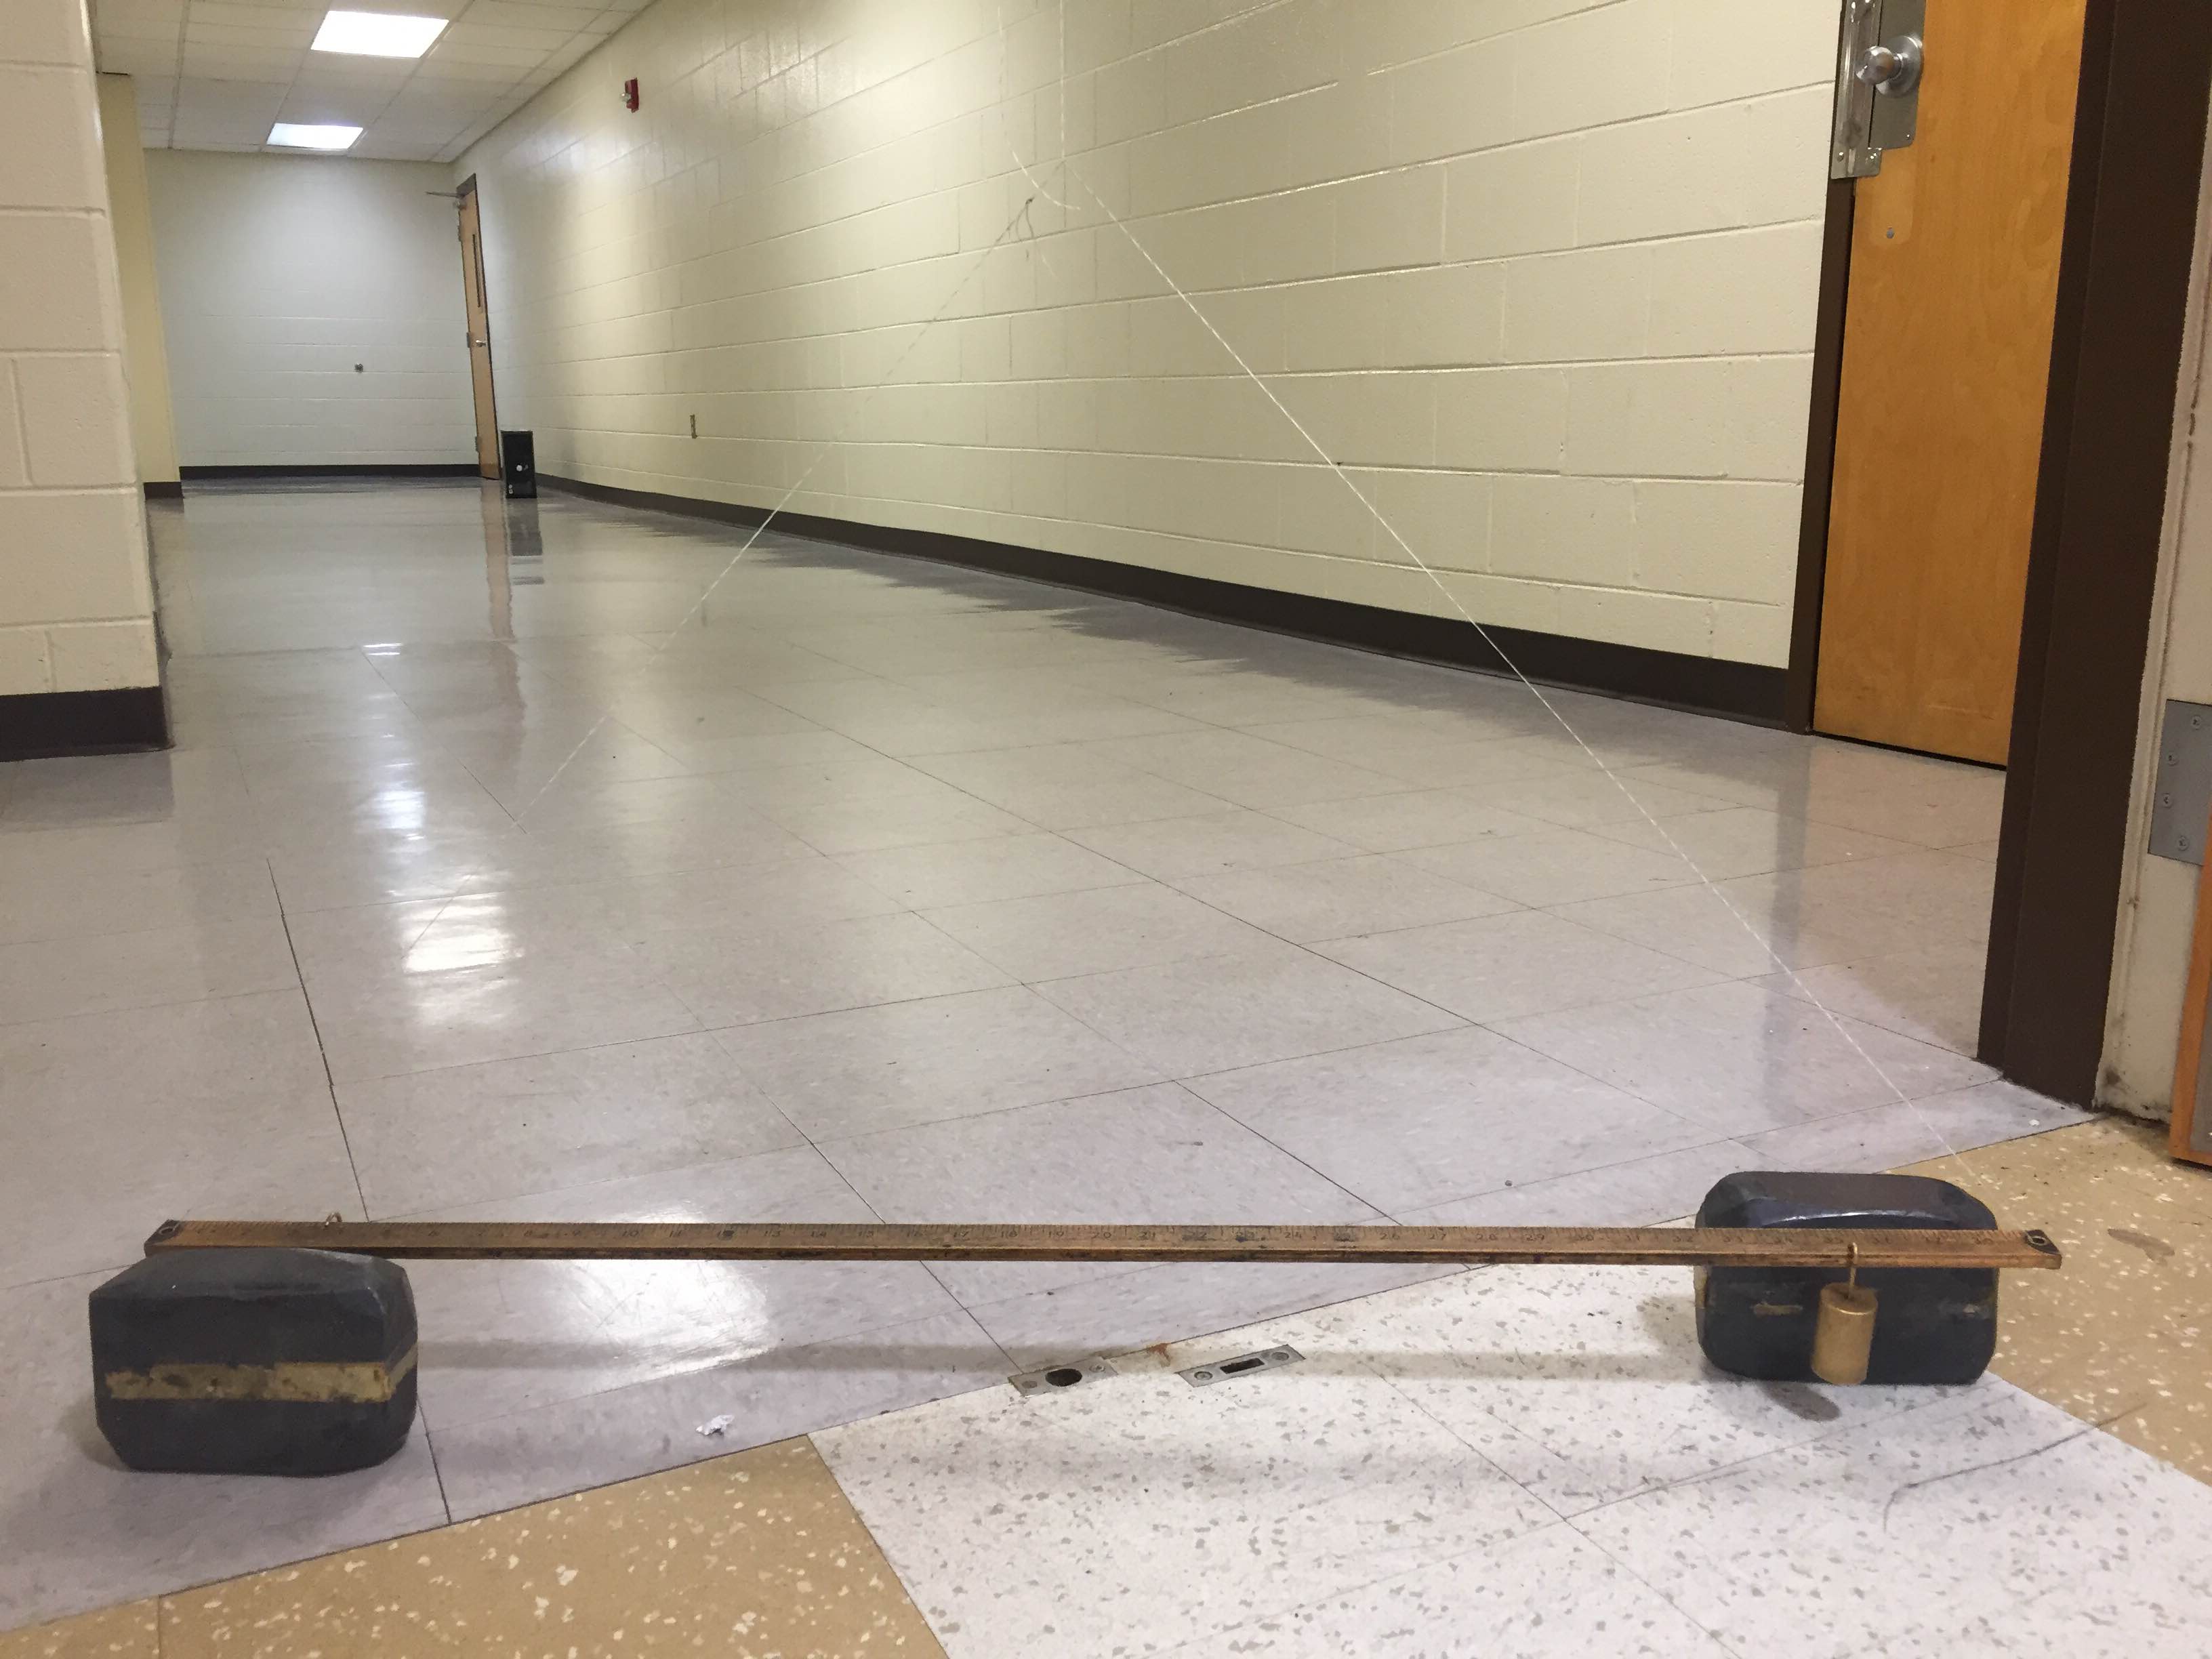
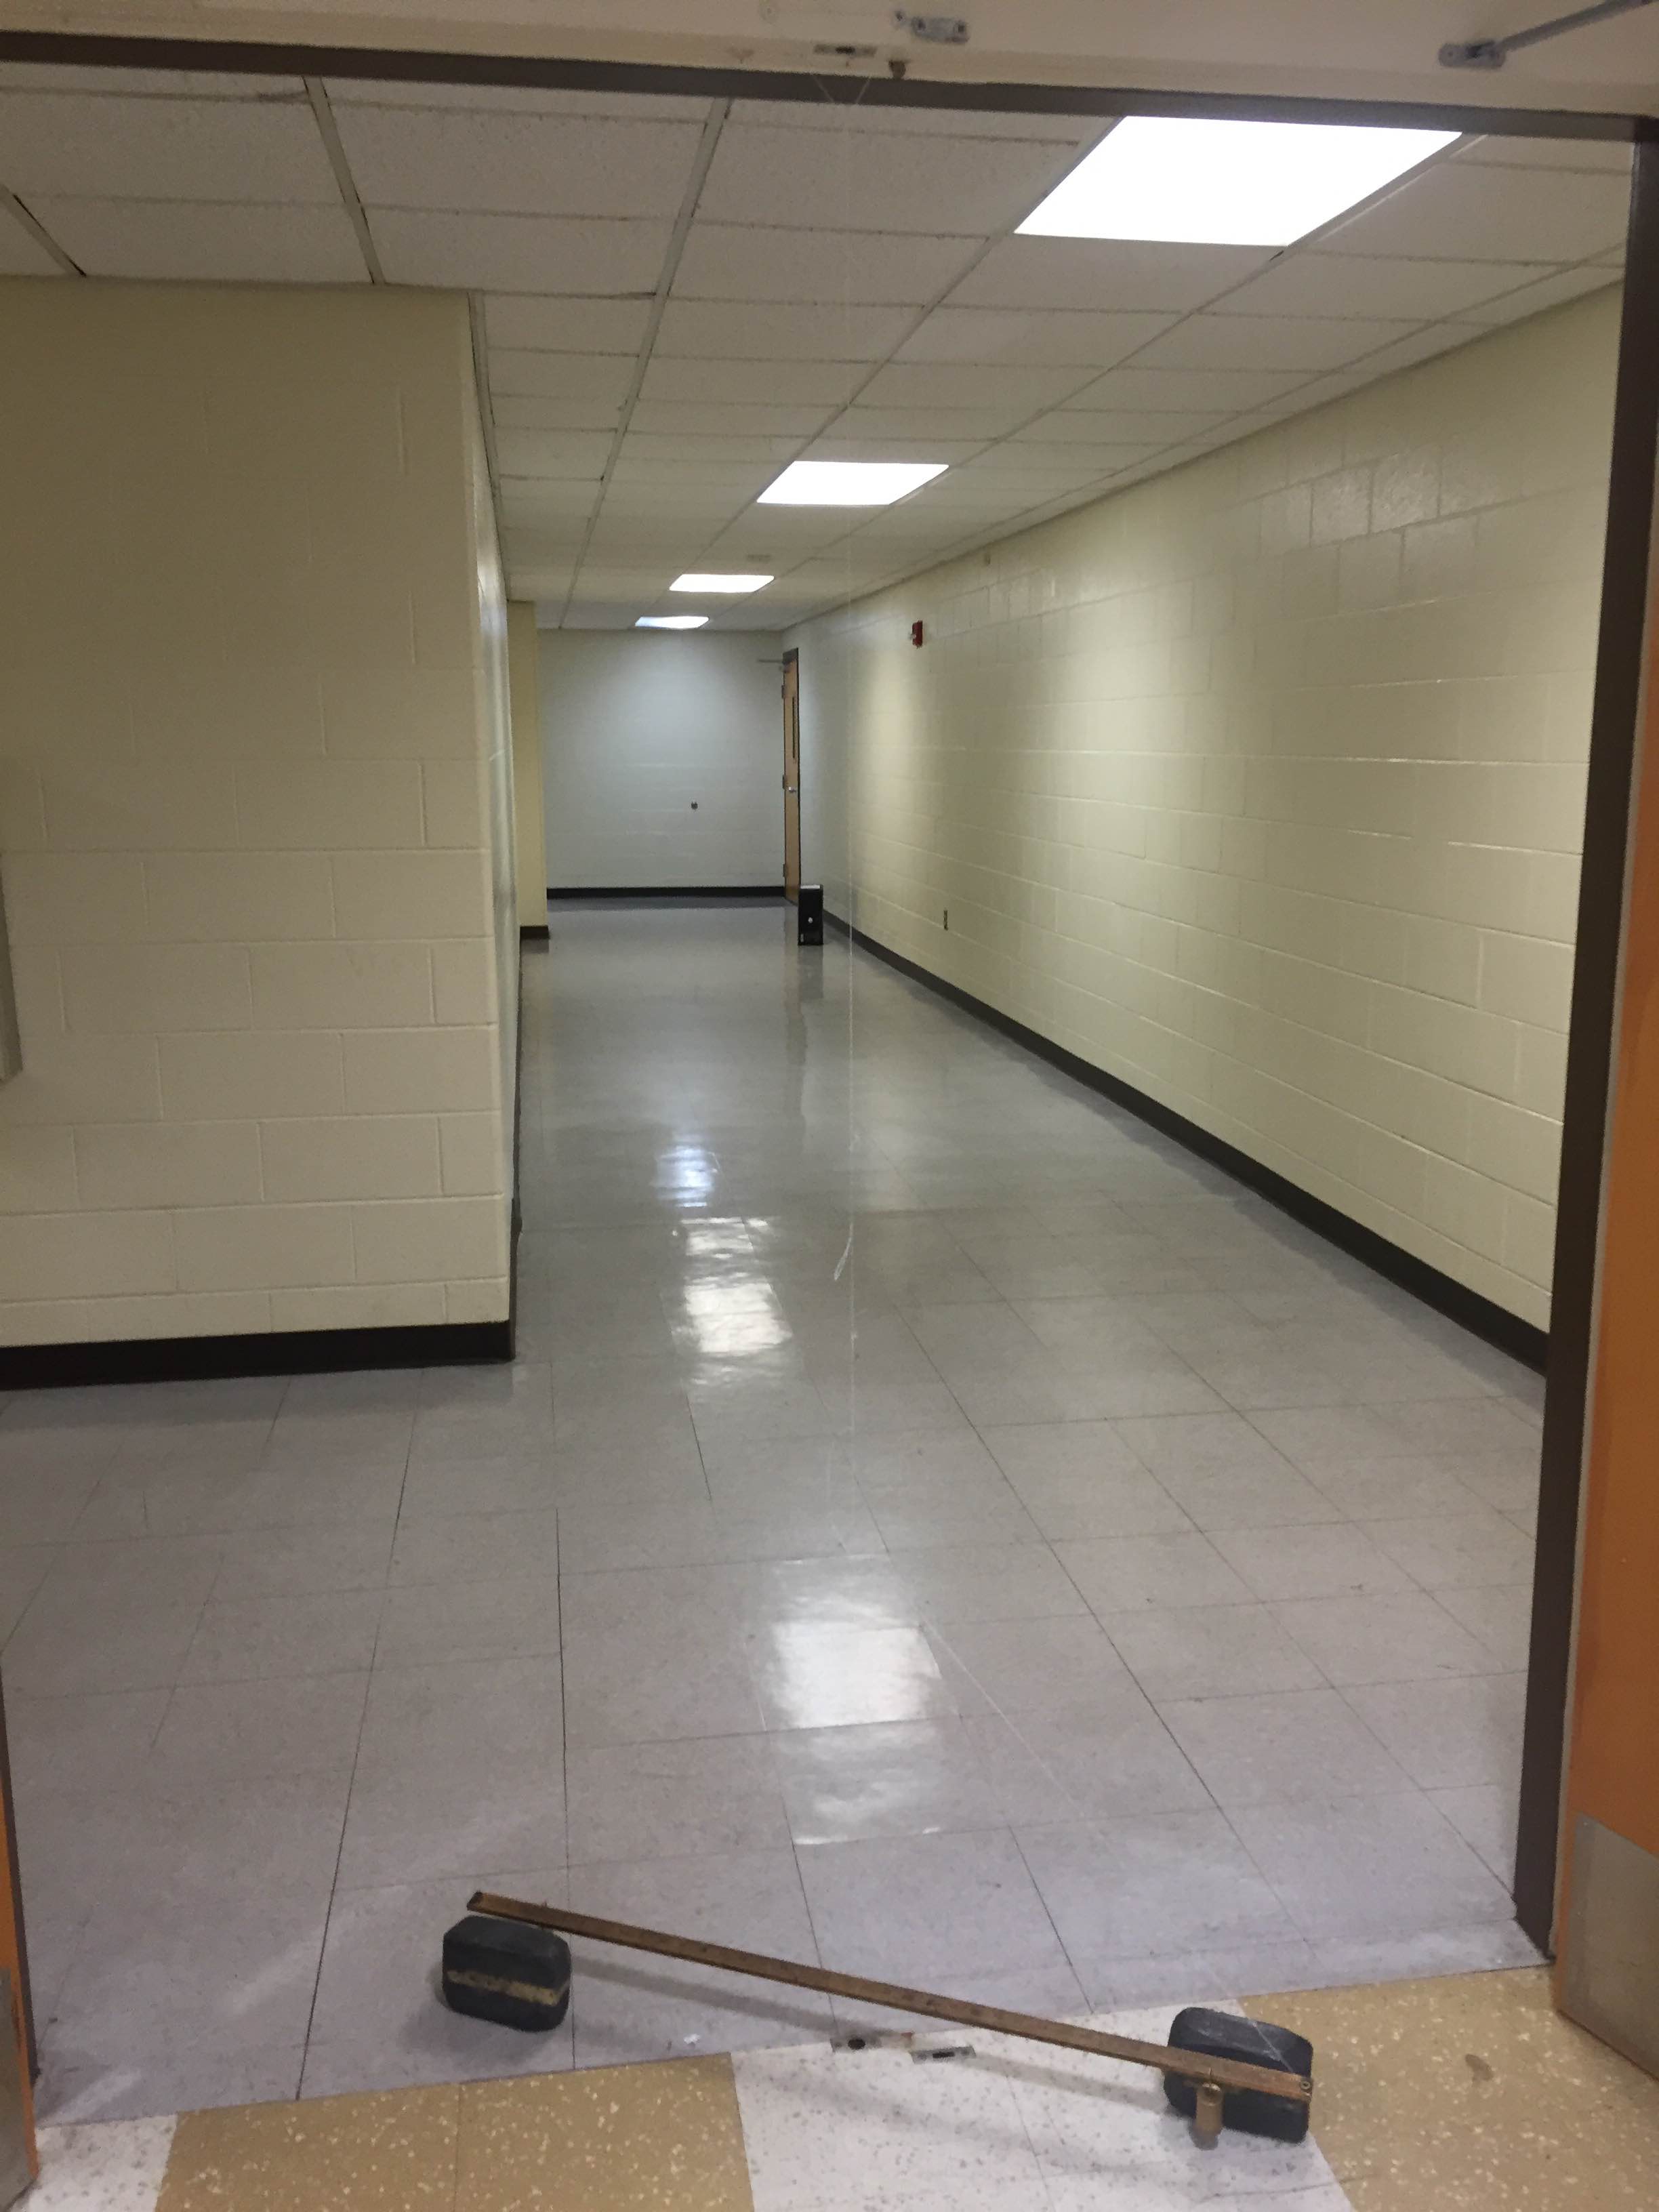
  1. Use some combinations of labs, demos, and discussions around clicker questions to (i) give familiarity with phenomena, (ii) motivate some new concepts, (iii) and provide instruction and practice with reasoning about new concept (e.g., before learning about Torque, students did a lab exploration to see what effect forces at different distances had on how hard it was to balance a rod.)
  2. Then, if needed, carefully model a specific skill involved in problem-solving (e.g., we carefully modeled how to find the torque do to different forces about a pivot, emphasizing how to make good diagrams and tables to organize one’s work). This is most like doing worked examples.
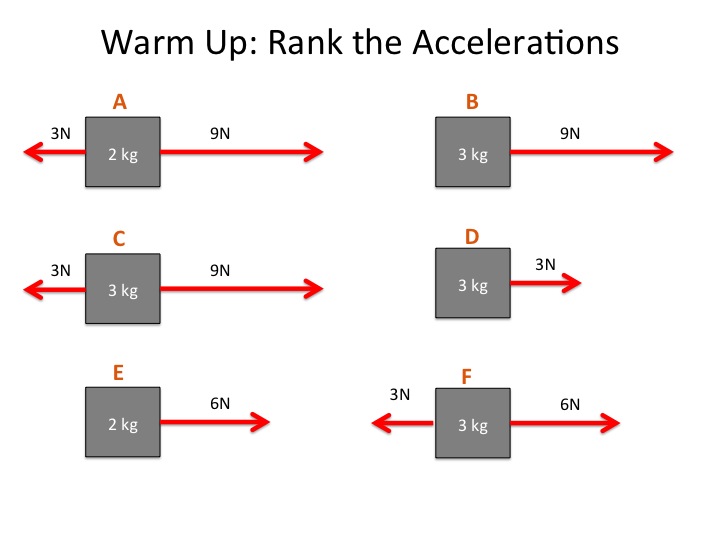
  3. Immediately after modeling the skill, provide students with multiple and varied practice with the skill (e.g., students worked mini-whiteboard problems that involved calculating torque for different scenarios.) This part is mostly “monkey see, monkey do”. Students try to closely follow what you did, but that’s OK, because that’s the point right now.
  4. But then, give them problems to solve that embed that skill without ever explicitly showing them an example of how to work those problems (e.g., students had several problems of varied difficulty finding the angular acceleration of objects). At this point, students have to figure out how to solve the problems and how to make use of the new skill.

With this particular example of torque and angular acceleration, we also had demos and clicker question discussions around moment of inertia and Newton’s 2nd Law of rotation. We reasoned with the ideas, but didn’t do any formal calculations.

I know that this is certainly not the ideal model for inquiry learning… that is, students in our class are not doing a lot of discovering or inventing. In our class, they are encountering. Our constraints and pacing make it difficult to invest the time in having students deeply explore a phenomena in ways that allow discovery and invention. However, this method is working a lot better than doing worked examples of problems. The reason why I suspect is that certain skills (like finding torque) benefit from following carefully the moves of an expert. Problem-solving however is not about “following”… it’s about “figuring”. We’ve been giving students practice in following along when its helpful, but leaving them to figure things out when that’s what needs to be learned. Striking the right balance between letting them “follow” and encouraging them to “figure” isn’t always easy. Some days we’ve done a great job. Other day, it wasn’t quite right.

All and all, though, it’s been a good experience to see our students figure their way through problems, rather than trying to emulate their way through problems. The good part of the skill modeling and practice we do has been that students enter the problem-solving phase not “frustrated novices”. They aren’t perfect at the skills yet, but they’ve gotten enough practice that they can focus their thinking on the “figuring” of the problem, with some confidence that they know how to use the skills well enough.

Keeping This Unit Coherent through Gravitation

The unit I initially dreaded keeping coherent was a unit that included:

  • Uniform Circular Motion
  • Universal Law of Gravitation
  • Angular Kinematics
  • Torque and Angular Dynamics
  • Static Equilibrium

So far, how we have managed to keep it coherent is through gravitation. After circular motion, we went into the Universal Law of Gravitation. As I’ve blogged about, we spent a fair amount of time talking about the Cavendish experiment. Armed with the Universal Law of Gravitation, students worked a problem in class to calculate the mass of the sun. It’s a pretty cool calculation to work, because all you need to know is the length of the year and the distance to the sun. We give students the mass of the earth (so groups can approach it through piece-wise calculations), although many students realize they don’t need it.

Then, angular kinematics, torque, and Newtons’ 2nd Law for Rotation culminated in us returning to the cavendish experiment Students had a challenge problem of calculating how much angular acceleration the rod would experience. This forced them to draw upon their knowledge of universal gravitation and angular dynamics. We then used angular kinematics, estimating how long it should take the rod to turn (~.06 radian), using the not quite correct assumption that the angular acceleration is constant. We get a good estimate, of 10-11 minutes.

Although I’ve experienced it as a coherent, I know enough to know that doesn’t necessarily mean the students have.

Circular Motion FBD Clicker Questions

In physics today, we spent a long time discussing clicker questions that ask students to identify the correct freebody diagrams for three situations:

1. Objects swinging through the bottom of pendulum swing

2. A car cresting a hill

3. A roller coaster passing through top of loop.

In total we probably spent 45 minutes in discussion. [Note: Next time I want to have quantitative demo setup for first, so that after debate we can see tension is larger than the weight. I would have to think hard about how to set up the cresting hill demo to measure the normal force.]

Anyway, I really let groups discuss these questions. On first one, our first hurdle concerned forces in direction of motion. That wasn’t too difficult because it’s an issue we’ve wrestled with in 1D, but definitely had a fair share of students picking those as their initial response. Even though students argued well that since we know acceleration is inward the net force must be inward, there was a big contingent unconvinced. This is where having quantitative demo would help, but only after getting arguments on table. Mostly they were unconvinced because of wanting their to be a stronger downward force. What was convincing to many is the idea that you would be worried about breaking the string if you had a lot of velocity. Having higher velocity causes greater tension, and the greater tension would break the string. I tried to connect this idea to, it’s because of the greater tension force upward, that the pendulum gets turned upward.

The cresting hill was not made easier just because of the insight with the previous one. While many still argued that Fnet must point toward center, meaning weight was larger than normal; a still strong contingent still argued for upward force being larger. It took several arguments to clear this up: first realizing that the sensation of car going up was not a force. Before cresting hill, there was some upward velocity (even liquid in your belly might still be going up! as you crest the hill). But real crux was figuring out what made the normal force decrease–it was this upward motion that caused car to “almost leave the ground” and therefore press less into the ground. Since you are less pressed into the ground, the normal force goes down. We contrasted this with hitting bottom of hill, the cars downward motion before hitting bottom would lead to tires pressing hard into ground.

In this question, the hold out contingency was crucial because it forced arguments to be clarified and for counter arguments to be addressed. It also forced us to ask, “How did that happen” not just “it must be true”. By talking about moments leading up to cresting and bottoming, we were attending to mechanism by which normal force could increase or decreases.

The third one was also hard. At this point, most students caught on that the net force must be directed toward center, but not all. Some students wanted more upward force to keep you from falling. But most wanted weight to be down and some other force less than weight to be up–still a net force down. Many students were eventually convinced of right answer…. Two downward forces. The main argument was that you should flip the diagram in your head to see that track pushes “in”. But the question  remained, “Wouldn’t that mean the car would fall?” Eventually the idea surfaced that it’s the velocity that carries you forward as the force tries to pull you down–I made connection to projectiles. But I wish I had asked, “have we studied any other kind of motion where an object has a force in one direction, but it doesn’t go in that direction because of velocity carries it as that force acts?”

After all that, I wish we had gone to solve one or more problems around those clicker questions. But our agenda has us pivoting to orbits and gravity. It wasn’t too bad of a pivot ending the last question talking about projectiles. But still, I want to use clicker questions to motivate problem-solving more.

Overall, One thing that was nice during these discussion was that students were listening and responding to each other rather than  just saying what they thought. It helped that I asked for people to state whether they agree or disagree and with whom. Students responded by often saying why they agree, which doesn’t always happen. I also asked students to not only tell me the right one, but to tell me one you know is wrong and why. That’s a lower barrier to entry. You don’t have to know right answer to contribute. Often this leads students who picked that one to speak up. Last thing I did was push for students who changed their mind to say why they did. What were you thinking at first? What did you hear that convinced you other wise?

I still don’t have all students engaged in whole class discussion. About a third of class contributes 90% of the whole class chatter. Most students engage in small groups as contributors. I need to think of how to pull more students in.

How Non-Algorithm Followers Solve Force Problems

In my last post, I was writing about students who are not following the standard algorithms as presented by our textbook, but still trying to solve forces problems in ways that make sense to them. One pattern of their work I talked about in that post was how these students don’t typically write out component using  Fy = F sin(θ) and Fx = F cos(θ).

Here are some examples of how students solve problems without doing this to the following problem.

IMG_1322

  1. Approach #1

Here is an approach by a student who began with the standard approach, summing the forces in both the x and y directions.

  1. After summing the forces in the y-direction, you can see the student concluding that T_By = 4500, which is correct. The vertical component of Tb has to hold the weight.
  2. For the vertical direction, the student uses tangent to relate 4,500 N Vertical component of tension, to the horizontal component of tension.
  3. Then to find the magnitude of the tension, they use the Pythogorean Theorem.

Note:  The “standard” solution would have written T_By and T_Bx in terms of cosine and sine and directly solved for magnitude of the Tension, and only considered the value of components implicitly. This student solved for each of the components explicitly and combined them to find the magnitude.

IMG_1324

Another approach using a combination of trig and Pythagorean theorem.

This approach also uses a combination of cosine and sine, but they never explicitly write an algebraic sum of forces statement. Because of this, you might be tempted to think that this student is just cobbling together random math in the hopes that it will work out. That was certainly my first response. But these concerns are largely gone once you see the image and how the student checks their work to show that the forces do in fact sum to zero.

In first picture,

  1. It seems like implicitly said vertical component of tension B = weight (4,410)
  2. Then, it used cosine to solve for the magnitude of tension

IMG_1329

In the picture, below

  • They implicitly say that horizontal component of Tb = Ta
  • Used Pythagorean Theorem to solve for Ta

IMG_1326

In this last picture,

  • Student checked their answer using cosine and sine to make sure their vector triangle worked out
  • Checked their answer by drawing a component only FBD to conclude that Fnet = 0

IMG_1325

I actually think the work they did to check their work shows sophistication, and is better evidence of sense-making them someone who just writes down the standard algorithm.

LA Lesson: Two Approaches to Learning Physics / CLASS Survey

Last night in LA seminar, we did my “Two Approaches to Learning Physics / CLASS Survey” lesson, which I’ve described here and here. This is one of the few lessons for the LA course that I’ve completely developed from scratch-rather than adopting, adapting, etc.

The basic gist is that students read David Hammer’s “Two Approaches to Learning Physics” in TPT. This paper describes two students -Liza and Ellen-who approach learning physics differently. In class, we categorize survey statements from the CLASS to decide whether it’s a statement that Liza would agree to or whether its a statement that Ellen would agree to, or both, or neither. Ahead of time, I color code the statements (red, green, and black), for red is statements that experts disagree with, green is statements that experts agree with, and black is statements that there is no expert consensus for. The statements are on big 8×11 papers that we tape to a huge Venn Diagram made on the front whiteboard. Students fill the Venn Diagram as we go.

This year, after small group work, I had students do gallery walk over the large Venn Diagram and *star* any statements that they would have placed somewhere differently. This made the whole-class discussion much more meaningful than last year. While we talked about where to place the statements, we had a lot of conversations about who students think they are more like, whether it’s better to be a Liza or an Ellen, about how it might be best to draw from both Ellen and Liza, about whether people start off as Liza and become more Ellen, about why Ellen is more expert like (but maybe less likely to succeed), about why courses tend to create more Lizas. We also had conversations about talking about Liza in a positive light, describing her as goal oriented, organized, aware of what needs to be done to succeed, rather than simply, “not interested in understanding”, “only cares about grades”. These conversations, of course, is the goal of the activity–not to decide where the pieces of paper go, but to reflect on how and why students approach physics differently.

This year, after discussion, Ellen was almost all “green” statements, Liza was almost all “red” statements. “Black” statements were mixed. Most black statements we ended up throwing out as “indeterminate”–that is we can’t say whether Liza or Ellen would agree or disagree without more information about them. I don’t tell students what the colors mean until the end.

Class this year ended with me showing and talking students graphs from various CLASS research showing that students’ learning correlates (from FCI) with CLASS scores; and graphs that show that a typical outcome is that students attitudes worsen. Students are generally interested in this and have questions, but next year I want to have students take CLASS before coming to class to save those 15 minutes. Then do a JigSaw with the research graphs, instead of presenting to the students.

More on Non-Standard Approaches to Solving Force Problems

I’m been doing more work attending to students’ spontaneous problem-solving strategies for forces:

This comes from several students I’ve observed recently, both in class and in office hours. For example, consider a problem where one force has components in both directions: A ball with weight 4N is held by two strings. One string is held horizontal, and another string is angled at 60 degrees (from horizontal).

After drawing FBD, the standard algorithm to solve for each tension might look like:

ΣFy = 0

(T2)y – w =0

T2 sin(θ2) – w =0

T2 = w/sin(θ2) = 5.8 N

ΣFx = 0

(T1)x – (T2)x = 0

T1 – T2 cos(θ2) = 0

T1 = T2 cos(θ2)

T1 = w cot(θ2) = 5 cot(60) = 2.9 N

Students I have found more spontaneously think about it this way:

  1. Reason that the upward component of tension (opposite side of the tension triangle) = 5N (to hold the weight). Draw 5N on the triangle.
  2. Knowng 5N is opposite, and 60 degree is angle, solve for “hypotenuse” of Tension Triangle using sin(60) = 5/T2 ==> T2 = 5.8N
  3. Reason that the two horizontal components must be equal
  4. Solve for “adjacent” side of Tension Triangle (using pythagorean or any trig functions), T1 = 2.9N

They aren’t always explicit about all of these steps as I am being, but it’s the general flow.

Basically, what I’m observing is that students are not prone to write out generic component relationships

(T2)y = T2 sin(θ2)

(T2)x = T2cos(θ2)

This is especially true when they don’t have a value for T2. If they had a value for T2, they would. Basically, students problem-solving strategies involve calculating in steps things that you can, rather than writing out algebraic relationships. They use cosine and sine to solve for numerical unknowns sides of the triangle.  They were able to reason about what the “opposite” value of their needs to be (5N), and then knowing the opposite and the angle, used sine to solve for hypotenuse.

Using the standard algorithm, we also have a tendency to go “straight” for the Tension, without calculating either component explicitly. We leverage the algebraic relationships.

What difficulties do I observe when students try to implement their strategy:

Sometimes, they forget to find the hypotenuse after finding the opposite side. This is even the case when students are super explicit that 5N is just the vertical component (or opposite side of their tension triangle). They seem prone to forget that this 5N is not the total tension (hypotenuse), and will proceed to step 4 as if 5N was the hypotenuse of the triangle. And so will do things like 5N*cos(60) to solve for the horizontal component.

Thoughts about the Instructional Tension:

I’m thinking hard about how I can do a better job of “building” on students’ problem-solving approaches, which I’ll describe as “step-wise numerical”.  For me, there are some “instructional tensions” here:  The textbook teaches the more standard algorithm. Even tutoring my students receive (from free from library or paid outside tutors) tend to teach the standard algorithm. While we have lots of students who benefit from approaches that are not strictly algebraic, we do have some physics majors in our algebra-based physics course–often (but not always) these students are more adept at actually using and understanding the standard algorithm. In addition, future courses will also presume facility and familiarity with approaches that are algebraic (not step-wise numerical). 

How do we find a balance between “building on and refining students’ step-wise numerical approaches” vs. “providing opportunities to encounter and become proficient at algebraic approaches”?

There are certainly some problems that the algebraic approach is advantageous:

  1.  Problems that involve systems of equations that need to be solved simultaneously
  2.  Problems where “mass” or other factors cancel out

But it’s not just about having a better approach, the outcome of the approach is different as well…

Different Approaches Afford Different Kinds of Sense-Making (After the Fact):

Consider that the result of algebraic approaches also gives opportunities for sense-making that you can’t readily do with numerical approaches. Mostly, sense-making involves thinking about how variables influence an outcome. For example, coming up we have some problems to work with circular motion (What’s the maximum speed a car can take a certain turn in rain)? It’s one thing for a student to get an answer of 25 m/s, and have to ask is that reasonable (that’s about 55mph, and even though that seems too slow for normal conditions, it’s raining.)?  This is the kind of sense-making I want my non-physics majors to have opportunities with. Physics majors, taking an algebra approach would get,  v= sqrt(us* g * R). Their sense-making would be around making-sense of the fact that more “coefficient of friction” or “wider turn” would mean you could go faster, and their sense-making might be around why mass doesn’t effect the maximum speed.

Both are valuable kinds of sense-making, but what’s an appropriate goal for whom weighs on me, and especially how to navigate these goals in a single class.

Challenge Lab: Using Tension to Slow Down a Cart

Our challenge lab for our forces unit was partially cobbled together last minute–various other ideas we had weren’t going to work for practical reasons, or were going to be challenging for students in wrong ways, or involved mastery of material which had not been a focus of our time learning forces.

This is what we ended up doing:

  1. A plunger cart would be launched off an end stop (this produces a fairly reliable launch velocity with practice). Students had to measure the initial velocity. Some used photogates. Some used motion detectors. A typical launch speed is between 60 cm/s to 80 cm/s depending on which cart you use.
  2. Next, the plunger cart would be attached a string so it’s part of half-atwoods setup. That is the plunger cart would be pulled back a string that goes over a pulley. Once over the pulley hanging mass puts the string in tension.
  3. The goal for students was to predict the location of an obstacle on the track so that the cart would be stopped just before hitting the obstacle. Students could do this by either fixing the mass and predicting the distance; or choosing a distance and predicting the mass.

The rules were the following: students could take measurements of the starting velocity of the cart without the string attached. And students could take measurements with the string. But they couldn’t use the string and the endstop together until they were ready to make their predictions.

To determine the dynamics, students approached the problem a variety of ways:

(1) Full theoretical treatment. One groups took this approach. Choose a mass, apply Newton’s 2nd law to both the masses and solve analytically for the acceleration. Using the acceleration, determined the stopping distance.

(2) Approximate theoretical treatment. Two groups took an approach where, for a very light mass the tension in the straight should approximately be equal to weight of the hanging mass. One group who explicitly talked about how it was an approximation and why, I let them go with it. The other group needed some help to see this was on an approximation, so I made them actually calculate how different tension and weight would be (after the fact). They had a tension if about 0.2 N, and calculated that we’d expect a difference between tension and weight of about 0.07 N. So not terribly unreasonable. Both groups in this case picked the lightest mass you could hang off the edge (0.2 N).

(3) Measure the Tension Directly:  Two groups decided to run the experiment with a force sensor mounted on the cart. Just measure how much tension force is exerted on the cart, and then apply Newton’s 2nd Law and kinematics to find the stopping distance.

(4) Measure Tension Indirectly: One group decided to just run the Atwood’s machine in order to speed up the cart (rather than have it slow it down), and measure the acceleration. From the acceleration, they could find the Net Force. Then assume that this same tension acts on the cart while slowing it down.

One group incorporated friction into their calculations, estimating that the rolling friction force was about 0.01 N. This changed their Net Force on the Cart from 0.18N to 0.19 N, which was enough of a difference to get a really good prediction.

——

One of the interesting things about these challenges, is trying to meet students where they are at. For example, I had not intended to let students take an approximate theoretical treatment. But, I’ve learned it makes more sense to help students with their approach, then upheave them. I had also not expected students to measure tension indirectly–> because you really just measure the acceleration. But it made sense to students; “If I find the acceleration, and I measure the mass, I can get the net force acting on the object, by using Fnet = ma”.

Ultimately,  this lab has a bit too much uncertainty to get great results. This is because the stopping forces required are pretty small.  0.2-0.5 N is what students typically needed.  With forces this small, friction and measurement uncertainty is going to play a big role. That said, all but one group had pretty good results. Since the goal is to “NOT” hit the obstacle, students not taking into account friction places the obstacle further than needed. In talking with groups, students could make sense  of why that might be the case.  I think next time, if we keep this challenge lab, I would explicitly make it a bonus to explicitly consider friction.

Overall, the challenge lab was good in the sense that students had to wrestle with dynamics and kinematics; they took different approaches and used different equipment; everyone got pretty good results.

Qualitative Cavendish Experiment: Prepping for PiM Lessons on Gravitation

Next week, we’ll be learning about circular dynamics and the universal law of gravitation. I plan on going through the Preconceptions in Mechanics lesson, very similar to the lesson as described by Frank. In the lesson, students are asked about to think about various possible causes of gravity (earth’s spin, earth’s magnetic field, earth’s mass, etc). They observe demos and discuss in a sequence. One might typically end the lesson by watching a video or reading about Cavendish’s famous experiment.

So anyway, over fall break, I got the itch to actually set up the cavendish experiment for myself–qualitatively that is. I originally set it up on the ceiling cross bars in the physics room, but these are just some flimsy aluminum cross bars that hold up paneling. I ended up moving my setup to a door frame to keep vibrations from the building from interfering. I’ve run the observation experiment dozens of times now, and was even able to show it live to a friendly colleague from Speech and Pathology. I’m pretty convinced that what I’m seeing is the gravitational effect, because I can get it with 100% reliability in both directions. There are few tricks to getting it working well, mostly just giving it time to reach equilibrium, and being careful when moving the bricks. But it’s really not terribly difficult. This could easily be a good project for students.

Here is what my setup includes and looks like:

  • 1 meter stick
  • 2-200 gmasses
  • 2 lead bricks
  • fishing line

IMG_1281IMG_1280

Here is a time-lapse video of a setup with a big deflection. The actual video is about 10 minutes long. I used i-phone time-lapse to make this. [Edit: This video, likely has acceleration from torsion in the string. Andy helped point out that this much deflection would likely take more time than reasonable]

I also have a time lapse video with a smaller deflection zoomed in on just one side: [Edit: This video seems more reasonable]

I plan on at least setting up the experiment for students and showing the video. I may venture into actually showing the demo in class, but I’m worried it will be hard to do. I may want to make a better video that’s not so nauseating. I’ll also let you know if I find time to approach the experiment quantitatively to estimate G.

Let me know if you have any questions about the setup.

Edit:  In general, what I’ve learned is it can take a long time for the system to settle into equilibrium before you bring the lead brick nearby. The next day when I went back to do experiments, people in the upstairs gym were playing basketball, and the system never reached equilibrium. The pendulum would twist 5 degrees or so back and forth over — over long periods of time. Moving to a building that is really isolated from vibrations is important.

Pivoting Toward Net Force Focused: A Day of Success

Thursday, in algebra-based physics, we pivoted away from the standard algorithms for solving forces problems and toward “Net Force focused” approaches.

We started the day with the following ranking tasks:Slide1

The point here was to get students oriented to thinking about Net Force in more concrete terms using “mental math”, and thinking about Newton’s 2nd Law in terms of how Net Force act on an object to cause acceleration (rather than a prompt to write down an algebra statements).

Later in the day, students were solving problems with interacting objets. An elevator with two stacked crates (5 kg on top, 10 kg on bottom) was accelerating upward at 3 m/s/s. Students had to find the force between the crates.

It made a whole lot more sense to students to say that the 5kg block needed a Net Force of 15N. Since the weight force pulls down at 50N, the upward force must be 65N to make the Net Force 15N. Similarly for the heavier block, although the reasoning is more subtle because you have to apply Newton’s 3rd law and contend with three forces instead of two. But students were able to get to the answer that if the heavier block is going to have a Net Force of 30N, their must be an upward for of 195N to counter the downward weight force of 100N and the downward force from the top crate of 65N.

Some groups still took the more formal algebra-based approach, but as a class we compared and contrasted the two approaches, which seem to help students make sense of it even more.

During discussion, we decided it was very helpful it is to actually draw the Fnet vector next to your freebody diagram. We also decided that after drawing free body diagrams with symbols, that we should label the value of forces (and/or net force) as we figure them out. So label the weight force w, but then write 50N next to it once you calculate that, etc. Same with Net Force Vector–once you have determined it’s 15N, you should write that next to your diagram.

In this approach, we are using the free body diagrams to support our thinking about the force arithmetic, as opposed to in the standard algorithm where you use the free body diagram to support you in writing down algebra statements.

The good things are this:

1.  We are doing more “sense-making” about the physics rather than following algorithms.

2. We are using math skills that are (more) empowering for (more) students.

3. Students now see the diagram as useful (and have even suggested ways they could be more useful).

We are certainly not all still there. Students need to be supported at times in some of the following:

A.  A few groups when they calculate the Net Force… they are prone to want this to be one of the forces acting on the block. They might decide it’s a force, or they might ask, “Which force is 15N?” This is a confusion I’m happy to spend time on, since it’s about physics, not about Math.

B. There are still quite a few students that struggle with mental math–it might take them several trials of guess and check to arrive at conclusion like… if there is 50N down and we need 15 N Net Force up to decide that the upward force must be 65N. This is math I also think is worth spending time on for these students, because if students’ number sense is like this, there is no point in doing crazy algebra.

C. Of course groups needed support in drawing the FBDs; we actually paused mid-problem-solving to share and discuss. Multiple normal forces with stacked objects is very challenging for students. A few groups even wanted to say that the elevator pushed on the top block. This is where system schema would help, but students are supposed to “draw” the boundary around the object of interest, and identify contact forces by which objects are in contact. Most groups who made these mistakes didn’t take the time to draw the situation out, identify the boundaries, and explicitly think about it.

Alternatives to the Standard Algebra Algorithm for Forces

In my previous post, I was writing about my dissatisfaction with teaching the standard algorithm for solving Newton’s 2nd Law problems. The standard algorithm is to sum the forces algebraically and set them equal to mass times acceleration.

A viable alternative to this approach is Force Vector Addition Diagrams. This alternative has lots of upsides, but one in particular that I like is the emphasis on Net Force. My argument here is going to be that the standard algorithm mostly avoids ever explicitly thinking about Net Force.

For example, consider a problem where a Tension force of 30N is accelerating a 7kg block at 3 m/s/s. The problem asks you what is the friction force acting on the block?

The standard algorithm would look like

 ∑ F = ma

T- f = ma

f = T -ma

f = 30 N – (7kg)(3m/s/s)

f = 9 N

A conceptual / numerical approach that focuses on net force might look like this

  1. OK, so how much force would a 7 kg object need to experience in order to accelerate at 3 m/s/s?

    a = Fnet / m
    (3 m/s/s) =  Fnet / (7 kg)
    21 N of force would be needed.

  2. OK, well how do we get 21N of force from these two forces?  Well, we have 30 N pushing forward.  That must mean we have 9N of force opposing.

These approaches are logically equivalent, but conceptually miles apart in terms of the thinking that a person does. The first one basically just uses Newton’s 2nd law as instructions for how to write your algebraic sum of forces statement. And then it’s mathematics. It basically never explicitly says, “This object is experiencing a net force of 21 N”.

The 2nd approach treats thinking about Newton’s 2nd law separately from (but connected to) thinking about the sum of forces. It first asks the question, “How much force would get the job done?” and then, “How did the individual forces conspire to make that happen?”

So in my previous post, I suggested that the standard algorithm may not be right for students who are weak in algorithm. I want to make a stronger claim here. Whether one takes a more graphical approach (like in the link above) or any another approach (like the approach laid out here), I’ll venture to propose the following: Any algorithm that skirts explicit thinking about Net Force is likely to be a mistake (especially for students just learning Newton’s laws  and/or those with weaker math skills).

Note 1: Part of this has me thinking about the idea of “standard algorithms” in mathematics, and how the issue here is very similar. While this paper is about prompting force diagrams, it’s basically related in the sense that forcing students’ to use standard algorithms has unintended negative consequences. In the paper, there are examples of more intuitive approaches, where students successfully solve problems by calculating in bits and pieces rather than the standard algorithm.

Note 2: A second questions relates to if/ how / when to move students toward something more like the standard algorithm. What contexts help motivate it? What scaffolding helps bridge it? What populations of students should this even be a goal for?

Blog at WordPress.com.

Up ↑